How to Print Posters at Home (Complete Guide for High-Quality Results)
Get sharp, high-quality poster prints at home with the right settings, paper, and simple adjustments.

How to Print Posters at Home (Complete Guide)
You’ve created the perfect poster. The design looks great on your screen. Now comes the part that can make or break it: printing.
A good print can make your poster look sharp and professional. A bad one can leave it looking blurry, dull, or slightly off in ways that are hard to ignore.
The good news is that printing high-quality posters at home is easier than most people think. You just need the right setup and a few key adjustments.
Why Print Quality Matters
Digital designs don’t always translate perfectly to paper.
Things like resolution, paper type, and printer settings all affect how your poster turns out. Taking a few extra minutes to get these right can make a huge difference in the final result.
1. Choose the Right File Format
Before printing, make sure you’re using the best version of your poster.
Most tools export files as PNG, JPEG, or PDF. While all three can work, PDF is usually the best option for printing. It preserves sharpness, keeps dimensions consistent, and avoids the compression issues you sometimes get with image formats.
If PDF isn’t available, use the highest-quality PNG you can export. Avoid low-quality JPEGs whenever possible, especially for larger prints.
2. Understand Poster Size
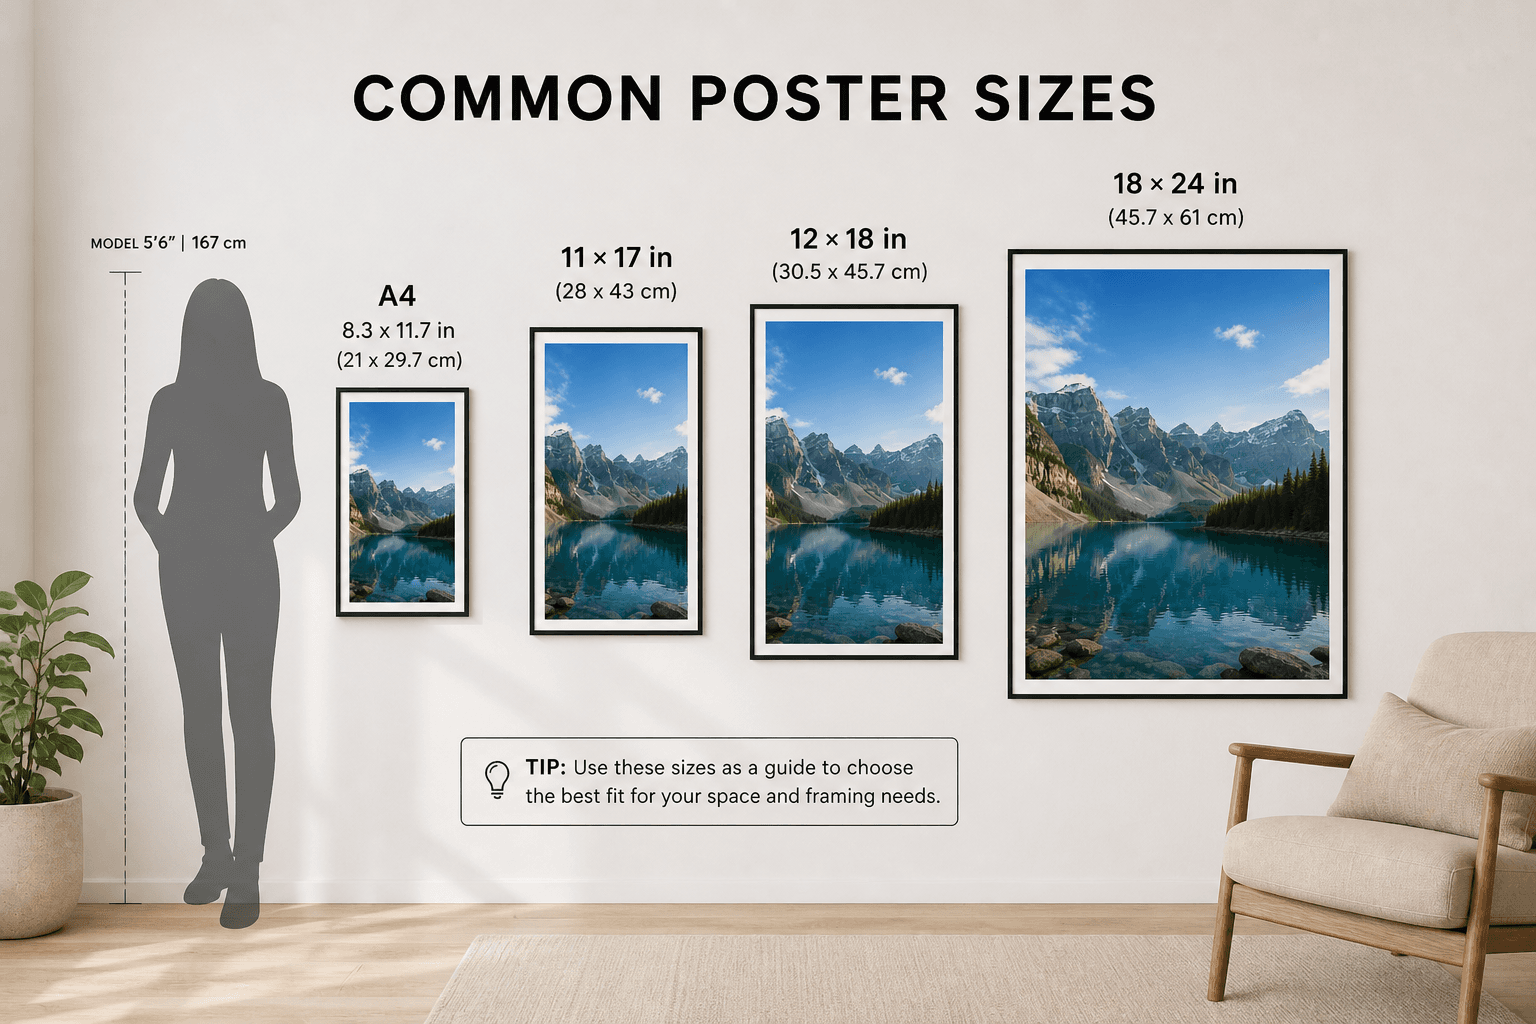
Choosing the right size is important for both print quality and how the poster fits your space.
Common poster sizes include 11 × 17 inches, 12 × 18 inches, 18 × 24 inches, and A4 (8.3 × 11.7 inches). If your design tool provides fixed size options, it’s usually best to stick with those. Resizing after the fact can lead to distortion or loss of quality.
It’s also worth thinking ahead about framing. Picking a standard size will make it much easier to find a frame later.
3. Check Resolution (DPI)
Resolution determines how sharp your poster will look once printed.
For best results, aim for 300 DPI (dots per inch). This is the standard for high-quality prints. If needed, you can go as low as 150 DPI, but anything below that will start to look noticeably blurry.
A simple rule of thumb is this: if your design looks sharp when you zoom in on it on your screen, it will usually print well.
4. Use the Right Paper
Paper choice has a bigger impact than most people expect. It can completely change how your poster looks and feels.
Matte paper has a smooth, non-reflective finish and works well for a clean, modern look. It also reduces glare, which is helpful if the poster will be displayed in a bright room.
Glossy paper produces more vibrant, saturated colors, but it reflects light more easily. This can look great for bold designs, but may not be ideal in every setting.
If you want something that feels more premium, cardstock or heavyweight paper is a better option. It’s thicker, more durable, and holds up better over time.
If you’re printing at home, look for paper labeled “photo paper” or “presentation paper” for the best results.
5. Adjust Printer Settings
This is where a lot of people run into issues.
Before printing, take a moment to check your printer settings. Set the print quality to “High” or “Best,” make sure scaling is set to 100%, and turn off any “Fit to Page” options that could stretch your design.
Also double-check that you’ve selected the correct paper type in your printer settings. This helps your printer apply the right amount of ink and can make a noticeable difference in the final output.
6. Do a Test Print
Before printing the full poster, it’s a good idea to run a quick test.
You can print a smaller version or just a section of the design to check how it looks. This helps you catch issues with color, sharpness, or alignment before committing to the final print.
It might seem like an extra step, but it can save you both paper and frustration.
7. Print and Let It Dry
Once everything looks right, go ahead and print your final version.
If you’re using inkjet paper, give it a few minutes to dry before touching it. Ink can smudge easily right after printing, especially on glossy or photo paper.
Letting it sit for a bit helps preserve the quality of the print.
Common Printing Mistakes to Avoid
There are a few common mistakes that can quickly ruin an otherwise great design.
Printing at low quality settings is one of the biggest ones. Always use the highest quality setting available. Using thin, standard printer paper can also make posters look cheap and less vibrant.
Incorrect scaling is another issue to watch out for. If your printer stretches or shrinks the design, it can throw off the layout. Finally, keep margins in mind. Some printers can’t print edge-to-edge, which means parts of your design could get cut off if you’re not careful.
Printing at Home vs. Using a Print Shop
Printing at home is convenient, affordable, and works well for smaller poster sizes. If you already have a decent printer and good paper, you can get great results.
That said, print shops offer higher-end printers, better color accuracy, and support for larger sizes. If you’re printing something big like 18 × 24 inches or want the best possible finish, it’s usually worth going to a print shop.
Final Thoughts
Printing your own posters at home can give you great results without spending much money.
With the right file format, good paper, and proper settings, your poster can look just as good as something you’d buy online.
Take your time with the setup, and the final result will be worth it.
